Help file on how to create inventory:
Clicking on the "Create Inventory List" button creates a Pop-up to enter Inventory. In our example, we have created a $5 Flash Sale with our Pop-up. Setting Claim Number to 100 and Claim Number End to 200, Product TItle to Flash Sale Clothing (or whatever your product category is), and Price to $5.00 means that when you go live, any item claimed from 100-200 will be recorded as Flash Sale Clothing for $5.00. (i.e., Sold 100, Sold 150, Sold 200).
Even if you use a CSV Spreadsheet for your live, you can introduce items during your live that you previously haven't entered. If you enter them into the Barcode/SKU box during the live we will pop-up this same "Create an Inventory Item" Box above. You can then give us any details about the item like Product Title, Price & Quantity.
If you are loading an Inventory CSV, You can drag it to the CSV box or click in the box to pick your pre-created Inventory Spreadsheet (a .CSV file saved with our template). It will then load your inventory, Tell you CSV Inventory Loaded and you can review that inventory below the Continue with Facebook button to verify it's correct.
CONTINUE WITH FACEBOOK - If your not using inventory or you just added inventory.
Once the inventory is loaded, you can scroll just below the "Continue with Facebook button to see the inventory. If it's a large list, you can scroll the inventory in list. Even click on an item to make a change before going live. Even if you close out your browser, we keep this inventory. Loading up Live Dashboard will load previous inventory as long as you haven't gone live with this inventory. Once you go live with inventory, that inventory is applied directly to the live you connect to.
Once you are satisfied you have any inventory loaded you wish to add, you can continue with Facebook connection.
Now click on the Blue "Continue with Facebook" Button.
Next, Facebook will ask you to Continue as your Facebook Profile.
The name you see is very likely your name; this is correct for it to list your name, not your business page name.
If it is the correct profile that has Business Page access, choose the Blue Continue "Profile Name" button.
Not Your Name Listed?
If that name there isn't your name/profile that has admin access, exit this setup, log out of Facebook on any browser and app on the device, then start over with this setup, and you can log into your correct Facebook Profile with Admin access to a business page.
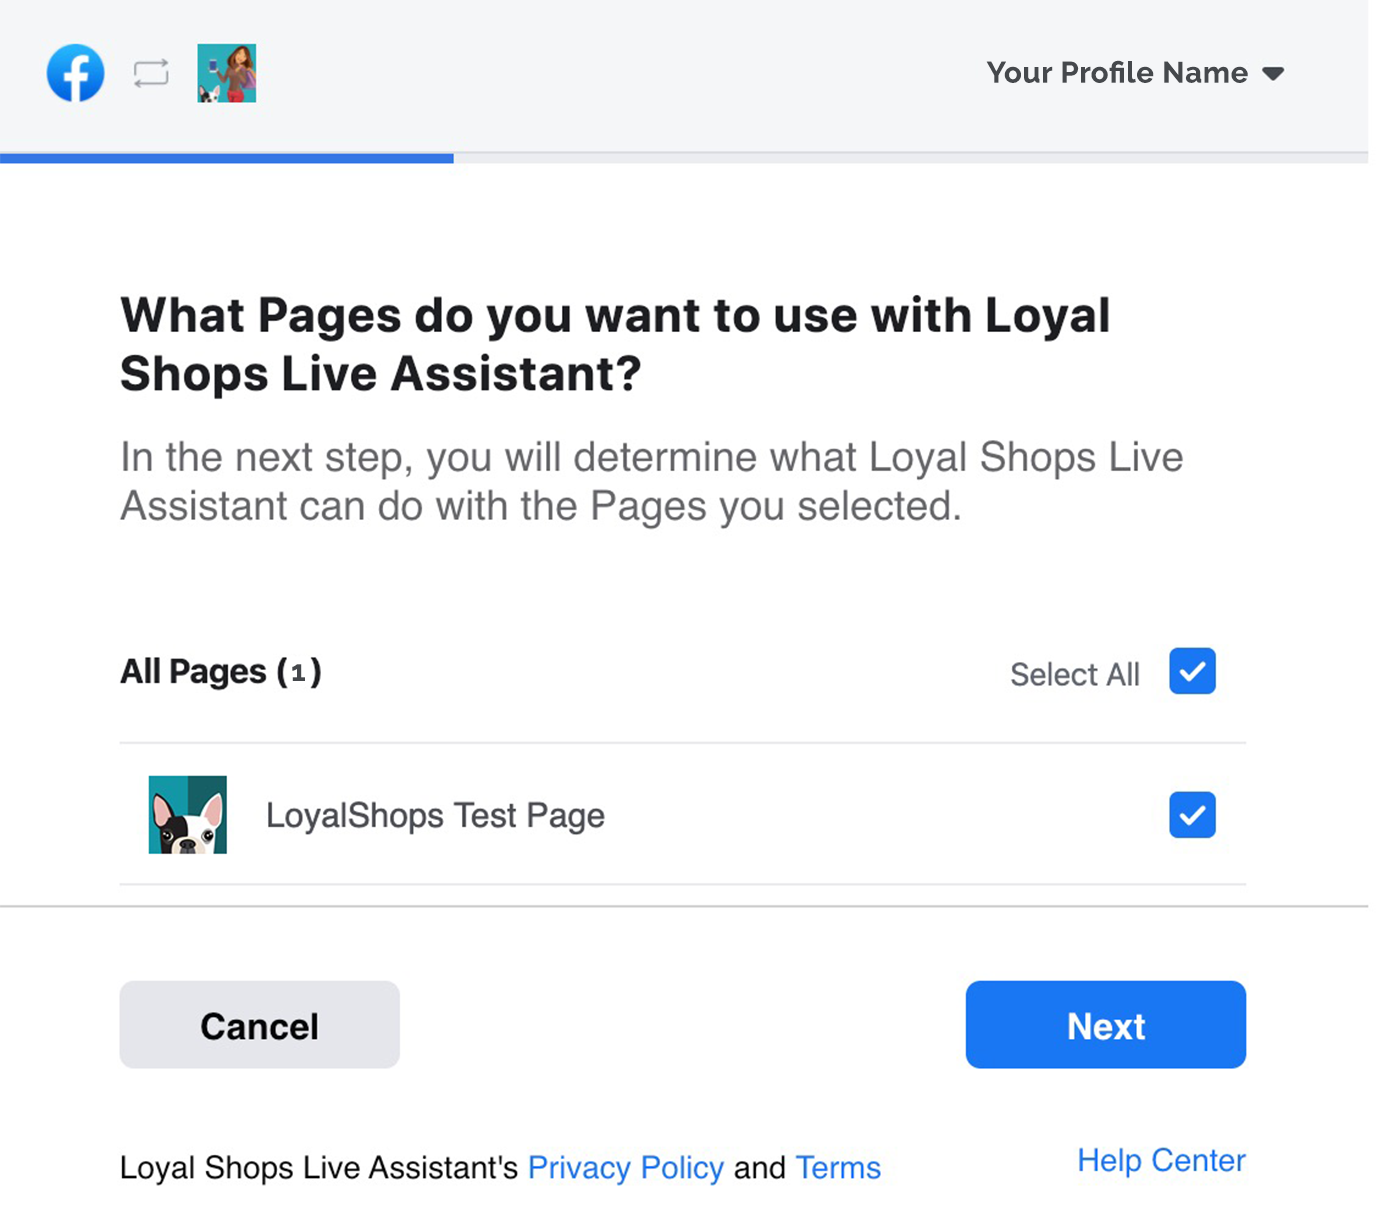
4) Choose Facebook Business Pages To Go Live On (You can add more pages/platforms at any time)
Facebook will now ask what pages LoyalShops Live Assistant Pro can access. We recommend selecting all of them. We only access a page you choose inside our software, but if you leave off a page in this setting, then that page will not be accessible at all inside LIve Assistant. So Selecting All is the most flexible and approves us to have access to your email address as well (but if you are positive there is a business page you will never want to sell in, you can uncheck it here, and Live Assistant Pro won't be able to access it). Choose the Blue Next Button after hitting Select All and making sure the business pages are selected. Again, if you don't see your business page on this list, you are likely on the wrong Facebook Profile, log out of Facebook and start these instructions over, or you need to ask permission to become an Admin of the Business Page you want to go Live on. Sometimes we find another family member or friend who made the business page, and the retailer isn't an admin in cases the page is missing from this list. If you're going to go live on a shared page/platform, they will give you permission just before your live starts, and we have another help page for Adding a Business Page / Platform to walk you through that just before you go live.
5) Permissions - Just leave as yes - Next Facebook asks for Live Assistant to have permission to receive your email address, manage your page and publish it to your page. These must all be YES for Live Assistant to function. Verify all settings are switched to YES like in the picture below, then choose the blue DONE button.
6) Congrats, FB Setup is completed; click the blue "OK" button.
7) START LIVE ASSISTANT PRO - After following the Facebook approvals, It will take you to a page to choose your Page / Platform you're going to go Live on. Use the drop-down "Choose Page / Platform" menu and choose the business page you wish to go Live on.
Business Pages can either be your own business page or other retailers' or business owners that specialize in sharing pages with other retailers to build it up larger and rent out the page by the hour for live selling. These shared Facebook Business Pages are often referred to as Platforms. Live Assistant Pro treats Shared Pages / Platforms a bit differently as many retailers may overlap their lives and can conflict on occasion. If you give someone access to your page, give them editor rights. While admin rights will work, editor rights are a safer decision unless you truly trust someone with full rights to a page/platoform.
8) Business Pages, Shared Pages/Platforms & Choosing Your Live Sale
For individual retailer pages, we allow a retailer to choose for Live Assistant Pro to wait for a live to start and then it automatically starts when the live does. That feature looks like the picture below:
Once the Wait for Your Live Option is chosen you will see the below screen and Live Assistant waits for you to start your live, then will wake up and help you.
At the top of the page is a circular business page icon showing you the icon for the current business page you are on. If there is a teal ring around the page icon, you are not live and if the ring is red, you are live. You can also click on this page circle if you choose to change the page or stream choice.
For Shared Pages / Platforms, there is no "Wait for your Live" option, just choosing a currently running live or connecting to YOUR recent posted videos. The removal of the "Wait for a Live" option on shared pages, avoids one retailer from waiting for their live to start with their LIve Assistant Pro, then another retailer starting their live first, thus connecting to another retailer's live service.
When we identify a Shared Platform chosen, we display this icon and the "Wait For Your LIve" feature is not available. Instead, you will start your live first, then choose it from this page when it appears.
Note for page/platform owners: If you manage a Shared Platform and don't see this icon on your page/platform, inform us at
support@loyalshops.com with your page name and link to your page and we will add your page/platform to our Shared Page Lists.
With Live Assistant Pro, you can get ready before your live even if you don't have the "Wait for a live to start option". Live Assistant Pro will continue looking for new lives starting. When your live starts, within a few seconds, it will show up in your Live Assistant Account.
After you have chosen your Page/Platform you wish to go live on, it's a shared platform, but you haven't started your live yet, it should look similar to the below picture:
Then, once your live begins, YOUR live should appear. Make sure you choose YOUR Live and not someone else's, As several retailers may go live at a similar time, so look at the picture and look at the live description to verify it's yours. When your ready, click on your live to begin your sale.
9) Running a LIVE with Live Assistant Pro
Once your Live is Up and Running, Your screen should switch to your Live Dashboard mode and you will see the circle profile icon has a red ring (Connected to your Live), states "Live Assistant Pro is ready for your first Claim!" and your initial Welcome Comment drops into your live. These changes show you are ready to start selling! BTW, the initial comment post is fully configurable on the Live Assistant Pro Settings Page.
Live Assistant Pro supports Barcode Scanning to pre-load / configure items as well as identify products for sale during the live. But you can also scan new products, but it defaults to qty 1 and our standard easy-to-claim item numbers.
Once here, You can choose a couple of different options to sell. You can hold up an item and Claim Number, giving the customer verbal information about the item and they can just respond Sold "Claim Number", like Sold 123.
In addition, you can hand enter a Claim Item, an SKU or Scan a Barcode before each sale. This will bring up the information on the item(s) along with price, inventory level, any variation options, etc. Doing this will also comment these details out to your customers as a comment.
Both ways will work throughout a live.
If you see a red rectangle around the Claim Item, SKU or Barcode box, it means that the Live Assistant Pro window has lost focus (you likely clicked on another window). You can't barcode in Live Assistant Pro when the red box is visible. Just click back into the Live Assistant Pro window to remove the red box and continue scanning your next item.
Once you enter a Claim Number, SKU, barcode your first item or someone claims a new item, you should see a screen similar to this:
This example product loaded is a Necklace and Earrings set. It lists the Claim Number (88 in this case), Prouct Description, Price, Any Variations like Size, Color, etc and Quantity available.
Live Assistant Pro will also comment on the details of the product into the live as the backup to your verbally telling them about the product, price & claim number.
Top right you see that there are 0 items in the cart and $0 in the cart, this increments as you gather customer claims in real-time with how many items have been claimed (in cart) and $ amount of those items claimed.
If you touch/click on the Avail: (Availability) section, it brings up the details on that item for you to change including increasing the quantity of that item. We recommend usually doing this before the sale in a Pre-Loading section, but it can be done during the live if you find more pieces or choose to show a piece you hadn't originally intended to sell.
Choosing the Quantity 5 button will instantly increase the volume to Qty 5 and close the inventory details page saving the increased qty. If you need to make other changes, make those first, then quantity last.
In this example below, customer Misty claims this item 88 with a Sold 88 and the optional Q2 stands for Quantity 2 she wished to claim. As you had just updated the item to Quantity 5, it claimed 2 of item 88 for her and commented back confirmation in the live. Note: Q, Qty, and Quantity are all usable for a customer to add more than one to purchase if available. Quantity purchasing is first come first served, so it's possible for the first person claiming to claim all available.
Live Assistant Pro can handle 3 claim words interchangeably. The default claim words are Sold, Wanted & Claim. If you wish to have your own personalized claim word, I recommend just replacing the word "Claim" with whatever other word you wish to use. That way, you can market your new word like "Bling", "Want",
"Take", etc, but Sold and Want still work as backup options.
As customers claim you will see their claim status show up on the bottom of the Live Dashboard screen. Blue Dots for Claim Winners, Red Dots for Runner Ups / Next In Line, and Silver Dots for Waitlisted beyond the Runner Up position.
Registration
In order for invoicing to happen, you usually need the contact information of the customer. Below shows two customers, Joy, and Gary. In this example, you can see that Gary has a red @ and a red Z showing we do not have this information for this customer yet. Either the customer can use a registration page built with our Landing Page Tool - We create a default registration page for every Live Assistant Pro Retailer or they can leave their email and zip as a comment in the live and we will automatically and in real-time, pull that information. Once they have done either, you can observe this as we will dynamically remove the @ if we receive their email and remove the Z if we identify having their Zip Code during the live. Anyone that is already registered, like Joy here, just will start the live without the @ or Z listed. This way, you know you have the needed information to invoice someone before the live ends. Note: LoyalShops recommends using registration pages to protect shoppers' privacy.

When you are done with your Live, Live Assistant Pro continues monitoring your lives for additional sales even if you leave the Live Dashboard Screen or even log out of your account and turn off your devices. This cloud capability of Live Assitant Pro will help you drive more sales and be more responsive 24/7.
Once the Live is over, then go to the Sales History page to see claims.
TIPS SECTION
SHARING TO OTHER PAGES & GROUPS
Live Assistant Pro must start in a Business Page to track customers' sales. Once a live is started, you can share with a FB newsfeed, other pages, and groups manually. If you go Live on a Page and also wish to share to your Group, start your Live in your Business Page, then inside your Live, you may find a Share Button, choose it, then select Group as one of the options and pick your Group from the list (you must be an admin of the Group to share a link in this way). Your Live is now in your Business Page and Group simultaneously, customers can join you Live from either location, and Live Assistant will manage sales for all.
If your using a computer, here is another method to share your live to a Group, Page, or Newsfeed easily with your computer:
REGISTRATION - capturing customers' contact information for invoicing
Leaving Email and Zip in the Live.
While not our preferred method, Live Assistant Pro will automatically pick up customers' Emails and Zipcodes commented in the live and apply them to a customer record in your account.
Registration Page
We automatically create a registration web page for every LIve Assitant Pro account and your Live Assistant Pro service will automatically request customers to register for your live. You can find this link under LIve Assistant Pro / Settings and under Landing Pages, Edit Landing Page and choose "LiveRegistration" in the "Select An Existing Landing Page To Edit". You can then modify this page if you choose in order to further customize it for your business. You can also quickly adjust this page to opt customers into texting once you choose to enable our Texting Service.
LoyalShops Texting - Drive More Shoppers To Your Lives with Better Notifications
Many of our customers that use Live Assistant Pro also use our Texting service. We have a texting feature called Shop Live Notifications. Once you have customers signed up and turn on Shop Live Notifications, we can automatically send out a text to any customers on your texting list with your Live Description and the Link to the FB Live you just started and they will receive it within seconds of you starting the live. This is a great way to drive your best customers to your sales as FB notifications are quite poor these days.
Cheers, LoyalShops Support