First Time Instructions
If your primary reason for using Live Assistant is to show all comments in real time during the live comments that are lost due to Facebook dropping comments, please go to our
Comment Catching - First Time Instructions instead. If you wish to use Live Assistant to capture sold comments and capture customer comments both, please keep reading this document.
Live Assistant requires the following:
A) Facebook Business Page: sometimes referred to as a Platform. Any live using Live Assistant must start in a Business Page, then can be shared to your personal newsfeed, other business pages and groups. Anywhere the live sale is shared, Live Assistant will manage those sales. but the live must start in a business page.
B) Two modern internet-connected devices - Often a Computer for Live Assistant and Phone for Facebook Live.
Most retailers will use two devices during a live using Live Assistant. Most often, a PC or Mac is used to run Live Assistant in a browser and we recommend Chrome as first choice, Safari as second choice as your browser. Then you use a second device, most often a phone or tablet to run the live as you normally would with the Facebook Application.
We recommend using the Chrome or Safari Browsers as the most compatible web browser we have tested on all platforms. As Live Assistant uses large fonts, it even works great on the small screen of a phone. This way, you can use a larger screen like a Tablet or Notebook to run your FB Live, so it's easier to read all the comments from your customers on the larger screen. We recommend you have your device powered on AC (not on battery power) and have power management disabled on your LIve Assistant device so that it doesn't accidentally go to sleep and stop tracking. For an iPhone / iPad, it's Settings / Display & Brightness / Auto-Lock / Never. For PC / Mac it's Settings / Control Panel, Power and on the AC Power power management option, turn the screen and sleep off or to multiple hours.
1) Quick Start
Log into loyalshops at www.loyalshops.com/login; then go to the Live Assistant menu, then click on the Live Dashboard sub-Menu.
2) Connecting To Facebook -
When you first get there, there is a quick setup with Facebook. This FB setup is for Live Assistant to receive permissions for Live Assistant to read and post to your business page. This setup is only needed the first time and occasionally if you change your password or for other security checks by FB. Normally, these steps won't be necessary and it's just a few clicks to start Live Assistant to be ready for your Live each time after this quick setup.
You may see Live Assistant needing to Log into Facebook. Make sure you are logging in with your account that has admin rights to your Business page (Picture 1). If your already logged in to Facebook, click on the Blue Continue with Facebook-Button. Facebook needs this to tell Live Assistant what pages your an admin on.
3). Continuing with Facebook To Give LoyalShops Permission To Help You
Next Facebook will ask you to Continue as your Facebook Profile.
The name you see is very likely your name, this is correct for it to list your name, not your business page name.
If it is the correct profile that has Business Page access, choose the Blue Continue "Profile Name" button.
Not Your Name Listed?
If that name there isn't your profile that has admin access, exit this setup, log out of Facebook on any browser and app on the device, then start over with this setup and you can log into your correct Facebook Profile with Admin access to a business page.
4) What Pages May You Want To Use With Live Assistant?
Choose Facebook Business Pages To Go Live On (You can add more pages/platforms at any time). We recommend you select all pages listed.
Choose the Blue Next Button after hitting Select All.
Note: If you don't see the business page your trying to use. 1) Are you sure the page your looking for is a business page (personal pages and groups won't show). 2) This list is directly from Facebook showing what business pages you have access to with the facebook profile you have logged in. Some times you or a friend/family member has logged into a different facebook account on this device. If so, log out of Facebook on all browsers on the device and make sure the same browser your using for Live Assistant is logged into the same profile as your Facebook app on your phone and same that has rights to the business page.
5) Permissions
Just leave all permissions as yes - Next Facebook asks for Live Assistant to have permission to receive your email address, manage your page and publish it to your page. These must all be YES for Live Assistant to function. Verify all settings are switched to YES like in the picture below, then choose the blue DONE button.
7) START LIVE ASSISTANT - Pick Your Business Page
After following the Facebook approvals, It will take you to a page to choose your Business Page / Platform - Use the drop-down "Choose Page / Platform" menu and choose the business page you wish to go Live on. Have no pages listed? Click below on the the "How do I add a page / platform" help file and follow those steps.
8) CHOOSE HOW TO ATTACH TO YOUR LIVE
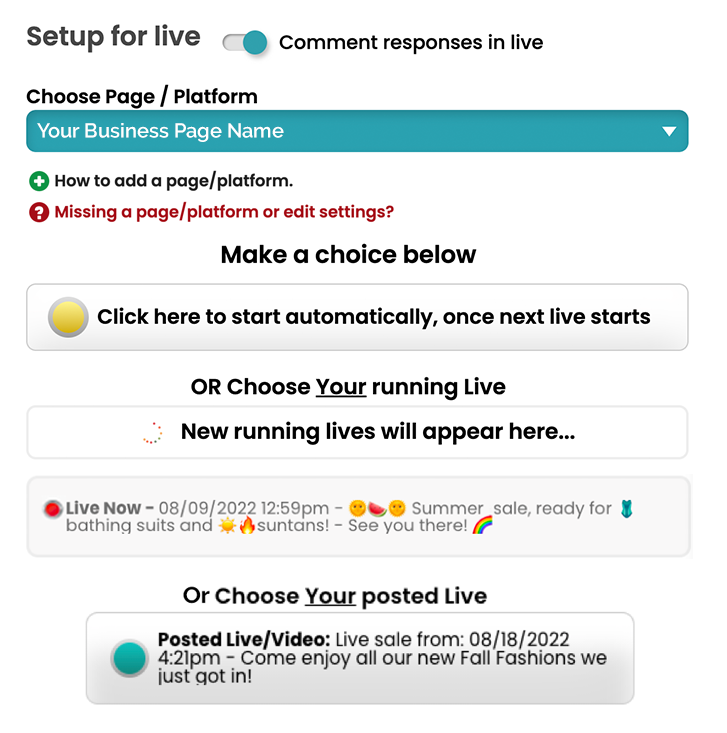
Once you pick a Business Page, New options appear below that. Leave the "Comment Responses in Live" checked. If you uncheck this, Live Assistant will track sales but won't comment to your customers they won. This can be useful if you want to run Live Assistant on a past live and want to look for sales without Live Assistant commenting on them. But typically, leave this on.
If Your On Your Own Business Page?
If you are on your own Business Page, and your ready to go live now, we recommend you choose the "Click here to start automatically, once next live starts" option. This will cause Live Assistant to be prepared to automatically start helping you track and record sales once you start the live on your second device.
Live Assistant is ready to help with your LIVE, when you’re ready!
Or If Your On Someone Else's Business Page / Platform?
As there are other retailers also using the same business page, we don't recommend using the "Start Automatic" feature. Instead, leave it right here and you can see the "New Running Lives Will Appear Hear".
You can now start the live on your second device on the same business page.
After approximately 10-15 seconds, you will see your Live information show up right under the "New Running Lives Will Appear Here".
In this example, you can see a Live has been started>.
If this is your live, click on it now and your Live Assistant will attach to your live, and begin helping you. We try to include a picture, date/time & FB Live Description you typed in so you can recognize your live from another retailers live. Please only choose your Lives to avoid attaching to another retialers live.
Also, if for any reason, you get disconnected from your live, you can use this "Currently Running Live" option to reconnect to an existing live and pick up from where you left off.
The third option is a list of lives already posted to that Page/Platform within the past 24 hours. Clicking on one of these existing / posted lives will read in the comments from those older lives. If you had already used Live Assistant on that previous posted live, clicking on your posted live again will check for any new comments / claim requests and process them since last time you used Live Dashboard on that live.
ADDITIONAL TIPS
That Gear Icon, lets you go back to the above settings and choose a different page or choose a different stream setting or turn to comment on or off. The OBS button is for those that use the OBS Open Broadcasting Software and need to enter a license key. If you aren't familiar with OBS, just ignore this feature. Usually neither of these are needed.
9) Running a LIVE with Live Assistant
Once your Live is Up and Running, and you have seen the initial Comment from Live Assistant, you are ready to go. BTW, the initial comment post is fully configurable on the Live Assistant Settings Page. Now, as your customers comment during your Live, Live Assistant will be looking for the three Keywords Sold, Mine & Claim, as well as Pass unless you have changed them in Live Assistant Settings along with a number you tell them. For example "sold 123".
The first customer to state Sold and an Item Number will claim the item, and it will be listed at the top of the Live Dashboard as well as will be commented to the customers that the FB User has claimed the item. If a second person tries to claim the item, it will also respond that they are on the waitlist in case it becomes available; the customer's name is now listed as runner-up #2 Red Ribbon and is told in a comment they didn't get the claim, but could if #1 Passes.
Finally, we track and save up to 2 waitlisted customers per number in case the winning customer passes (we then hand it to the next in line) or after the live doesn't pay. You now have someone else's name that showed interest during the live and can offer it to them.
The new claims are always at the Top and in a significantly larger font. This is done so you can easily read a new sale from a presentation distance. As new claims come in, they will be streamed below the latest claim, and you can scroll through that list.
At the top of the page is a gear icon. This will let you change Live Source (New Stream, Current Stream or previously recorded stream) or turn off bot commenting if there is a reason to do so.
When you are done with your Live, you can keep Live Assistant running, and it will continue to watch for claims after your Live has ended via the Live Posted Video. Posted Videos will show for 24 hours and must be longer than 5 minutes to show up.
Some retailers ask their customers to leave their emails as comments in the live. While this works and you can manually pull those email addresses using our Live Commenting menu after the live, we don't recommend that as the best method. Having customers drop their emails means you have the manual process of pulling those emails after the live and they aren't usefully stored for future use. Also, your competitors can capture your customer's contact info and market to them as well and scammers have been known to use those emails to send invoices !
So we recommend building a registration page with our Landing Page tool. You can create many of these pages and they are relatively easy to build. You can then share these registration pages anywhere including in Live Assistant. If you would like help, we are willing to build a registration page for you, for no additional charge. Just email us your logo (if you have one) and the web address (URL or www.) address of your Facebook Business Page to
support@loyalshops.com. If you don't have a logo, let us know two colors you like for your business (use descriptive color names like hot pink or blue, versus pink and blue. Also, if you have an Instagram link and even a website store, include those links as well.
After the live if you use a Registration page, you can find your customer information in the Customers Menu under Live Assistant Main Menu
SPEED VIDEOS
You can also use Live Assistant for Speed Videos. Record Your Video just like a Live with Claim Numbers and use your Keyword Number for claims. Then post your Video and with Live Dashboard, choose the Business Page, but instead of picking "A New Stream", pick the Speed Video below. Live Assistant will now monitor your Speed Video.
This is useful to post a Live and allow customers to "Shop the Replay", then you can run the Live again on that Replay to see if you captured additional sales.
Once Live or Shop the Replay is over, then go to the Live History page and see claims are listed by Customer, then their Claims.
NOTE ON SHARING TO OTHER PAGES & GROUPS
Live Assistant must start in a Business Page to track customers' sales. Once a live is started, you can share with a FB newsfeed, other pages, and groups manually. If you go Live on a Page and also wish to share to your Group, start your Live in your Business Page, then inside your Live, you may find a Share Button, choose it, then select Group as one of the options and pick your Group from the list (you must be an admin of the Group to share a link in this way). Your Live is now in your Business Page and Group simultaneously, customers can join you Live from either location, and Live Assistant will manage sales for all.
SHARE TO A GROUP, PERSONAL NEWSFEED or ANOTHER BUSINESS PAGE
If your using a computer, here is another method to share your live to a Group, Page or Newsfeed easily with a computer:
ADD A PAGE / PLATFORM
Drive More Shoppers To Your Lives with Better Notifications - LoyalShops Texting
Many of our customers that use Live Assistant also use our Texting service. We have a texting feature called Shop Live Notifications. Once you have customers signed up and turn on Shop Live Notifications, we can automatically send out a text to any customers on your texting list with your Live Description and the Link to the FB Live you just started and they will receive it within seconds of you starting the live. This is a great way to drive your best customers to your sales as FB notifications are quite poor these days.
If you are on a PC, you can hold the CTRL KEY, then hit the + key to make fonts larger. CTRL & - key will shrink the font size.
If you are on a MAC, you can hold the COMMAND KEY, then hit the + key to make fonts larger. COMMAND & - key will shrink the font size.
Cheers, LoyalShops Support