Live Assistant Pro - Checkout Assistant
Checkout Assistant Introduction
Want Order Checkout to be faster and not manual? This is the place.
Product Description & Price
If you wish to have orders created for you for checkout, we need at minimum of a general item description & price per item your selling. With Live Assistant Pro, there are many ways to give us the basic description & price for items.
To learn by reading or watching a video ways to name and price your items for a live, please review this help file: Pre-Loading Inventory - 7 Examples. Also once you watch this video, you can call us and we can help guide you to the best way to create inventory in for your busienss style. If you are interested in barcoding your products so you can scan your items during a live, but don't have a detailed inventory list, please review this help file: Pre-built Key Price-Point Barcodes - Print them yourself & Scan
Order Settings
1) Checkout Assistant requires a Square Account: Sign up for your own Square Account if you don't have one here: Square Sign-Up
2) Enable Checkout Assistant: To use Checkout Assistant in Live Assistant Pro, the first task is to go to Live Assistant Pro / Checkout Settings menu and read and agree to the key requirements & tips on Checkout Assistant and choose Yes to proceed.
3) Connecting to your Square Account - Checkout Assistant requires your own active Square account that you can use with your Live Assistant Pro account. Click the "Link your Square store to Live Assistant Pro" button and follow the short steps to connect to your Square Account.

You will have a Green Check next to Square Account Status upon successful connection of your Square Account to Live Assistant Pro.

4) Sales Tax - It is your responsibility as the store business owner to understand the taxes you need to apply to your customers purchases. We enable the ability for you to select the tax rate levels you have created in your Square account. Please contact a tax professional if you are unsure what to charge your customer for taxes for your business. In Square, you can create Tax Rate Entries for specific State/County/City requirements. You can find that page at: https://squareup.com/dashboard/business/manual-taxes. Once you create one or more entries as needed for your unique business, Live Assistant Pro will allow you to apply those Tax Rates on a customer by customer basis. You will need to have the entry "Enabled" in Square for Checkout Assistant to use the entry.
Once a tax entry is applied to a customer, we will remember that entry and make an effort to apply it again on future orders.
Once you have enabled Checkout Assistant, you will now have an updated Sales History Page, you can choose per customer the tax rate that is needed based on your defined and enabled tax rules in Square. 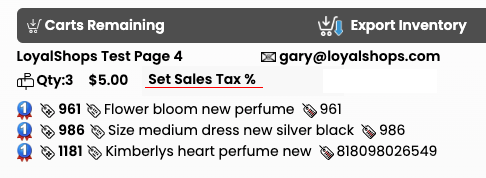
You can click on Set Sales Tax % and it will bring up a pop-up with a drop down menu that will list all the Tax entries you created in your Square account so you can choose and apply the appropriate tax rate for that customer.
 Tax rates shown are only for demonstration purposes. Create rules based on your business needs and location. Seek a professional Tax Consultant for help if needed.
Once you choose one, that tax rate will be shown for that customer and then applied when you send the order.

NOTE: If you don't set a tax level for a cart and send the order, your deciding to send without tax applied. Please ensure that is your intention.
5) Shipping Costs - In Checkout Settings, you we have some basic rules you can customize to determine the default shipping prices for carts depending on how many items are claimed.
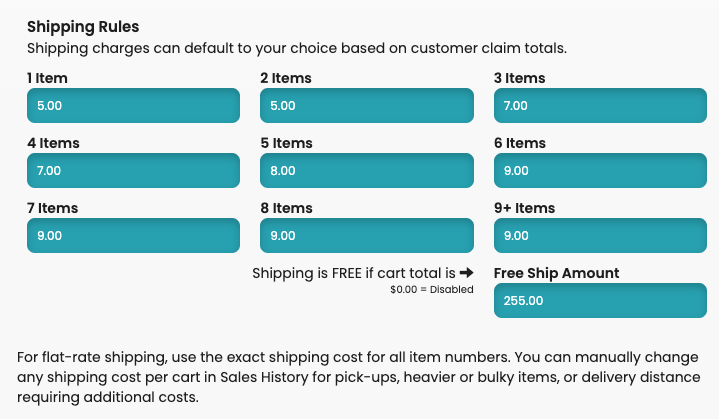
For example, if a customer claims 3 items, then as configured below, $7.00 will be applied to their orders.
In case you need to change the shipping costs, perhaps because the customer is going to pick-up so no shipping cost or perhaps the customer is located far enough away to increase shipping costs, or the items are more bulky or heavy, you can click on the Qty, Ship Price and Ship/PU text to bring up an "Edit Ship/Pickup Status or Price pop-up.
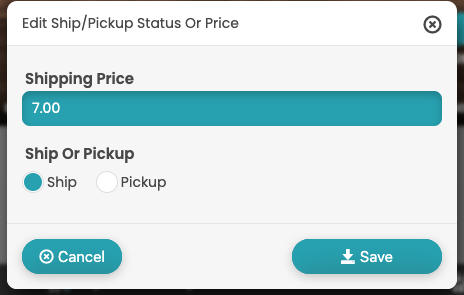
Under Shipping Price, you can manually enter a new price for that shipment. If you choose Pick-up, then shipping is set to zero. If you have already sent the order, then notice you need to change the Tax or Shipping rates, you can change them and as long as the customer hasn't checked out yet, it will dynamically alter the order for the customer to your corrected amount.
Sales History Orders
Note: It is possible to adjust an item description & change the price by clicking on them in Sales History. Even if you have sent the order to the customer, as long as they haven't paid for it, you can still change these items and they will update for the customer for checkout.
A) When you have completed a live, in Sales History each cart has a "Send Order" that is clickable.
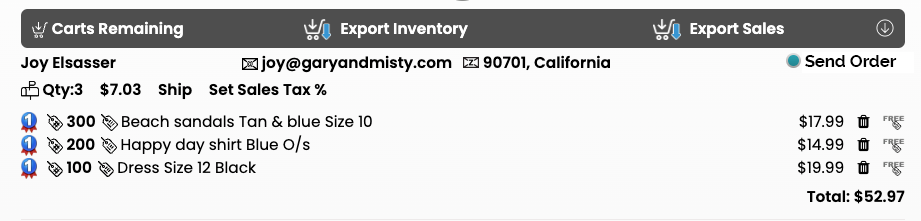
B) Before you send the order, make sure you have the customers email, if you don't have it, you can enter it in Sales History by either clicking on "Add Email" or the "Need Email" in the Send Order area.

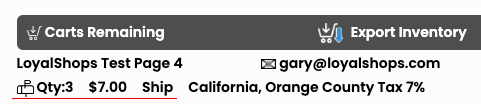
C) Review the Shipping area and determine if the customer is set correctly as a Pick-Up customer or are you going to Ship their order. If Pick-Up, the shipping will be set to $0. If Ship, then the default Ship price is decided by your shipping rules by quantity purchased in Checkout Settings. You can click the ship amount and manually override it for Free Shipping, Increased shipping due to bulk or weight of items, shipping delivery distance, etc. D) Check the Tax Rate area. If it is set to "Set Sales Tax %, there is no tax rate set for this customers order. Please click on "Set Sales Tax % in order to have the proper taxes withheld. This is your responsibility as a retailer to set the proper tax amounts for your customer orders. Consult a Tax Professional to verify the correct amounts.
E) In the below example picture, you can see the Tax Rate is set to a demonstration amount of 7% for California, Orange County Tax Rate.
F) Shipping Pick-Up/Ship & Tax Rates will be saved by customer, so the next sales order is further accelerated, can still be changed if needed.
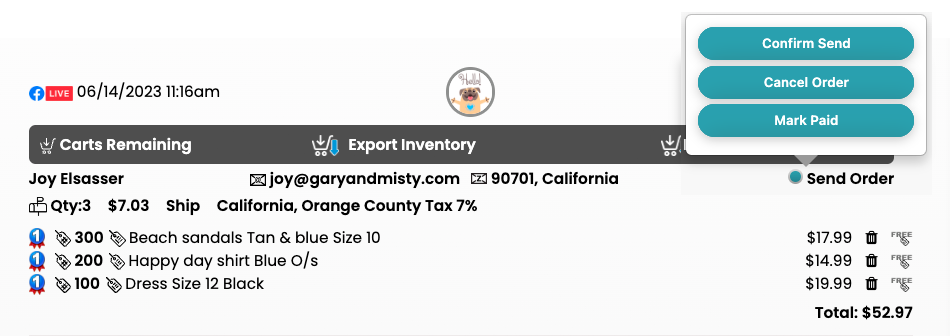
G) Once you have reviewed the Shipping and Taxes are correct, hit Send Order, and a Pop-Up comes up reminding you to set your tax rate and a Confirm Send button. Hit Confirm Send and the Order will be created in your Square account and emailed to that end customer and may be sent via Facebook Messenger as well if configured.
note: Cancel Order - Mark Paid Options: If the customer changes their mind or doesn't pay their bill, you can choose "Cancel Order". That will mark the order canceled, It will delete the items out of their cart so they can flow to the next in line on the waitlist. Mark Paid: If the customer pays for the order outside of our service, you can just mark the order paid. It will show Order Paid, and mark the items sold.
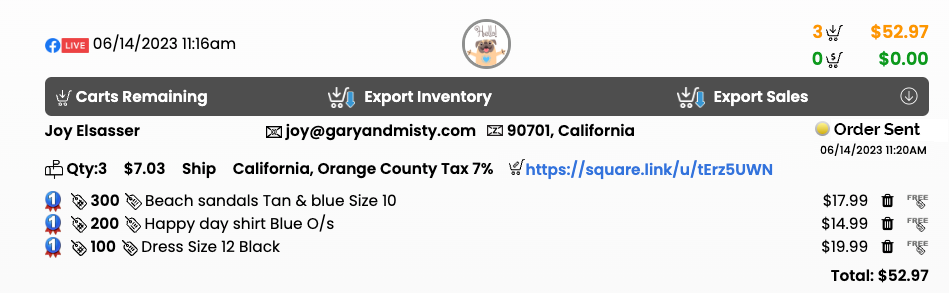
H) Notice that it now states "Order Sent" with the date/time it was sent above. The link to the order has been added as well. You can click on this link to view the order in Square and/or message it to the customer if they didn't receive it by email/FB messenger. If you click on "Order Sent", you can choose 3 additional menu options: "Cancel Order", "Mark Paid" & "Resend Order". Perhaps if the order was paid through some other way, you can choose to "Mark Paid". "Resend Order" will email the order to the customer again. If their email was wrong or not receiving it, you can change their email for the order and hit "Resend Order". Finally, you can choose "Cancel Order", and it will cancel the order for that customer. Cancelling will mark the order Canceled, the Items deleted and items will pass to the Next In Line Customers or be marked avaialble. If a customer that is passed an item already has an order that has been sent, but not paid, it will update the order with these items. 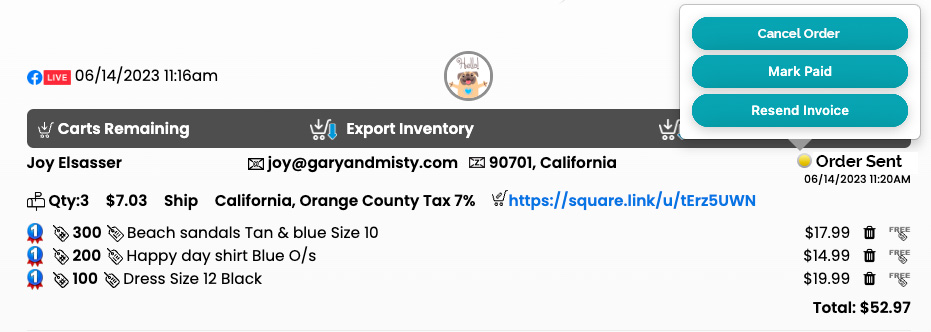
I) Once a customer pays their Order, You will get a green light and "Order Paid". Also noticed that the In Cart/Checked Out numbers change for the live automatically as customers checkout. Yellow and Green section above "Export Sales". 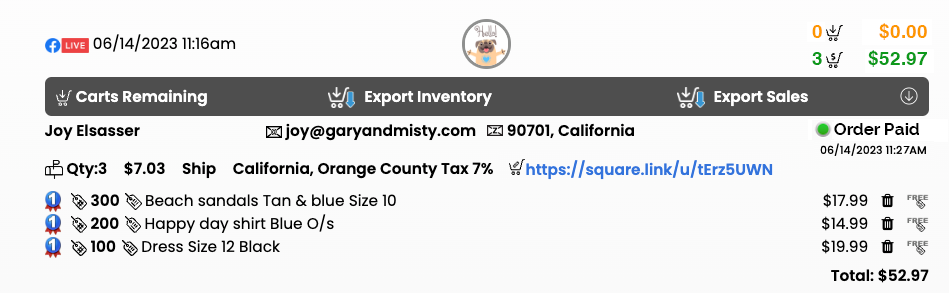
Customer Checkout Order Delivery
When a retailer chooses "Send Order", we send the customer an Email with information about checkout. If the customer has registered for Facebook Messenger Checkout Delivery, we will also attempt to deliver a checkout notification by Facebook Messenger as well. Please note, due to Facebook requirements, FB Messenger Notifications are specific to the rights you had when they registered. So if a customer registers for Facebook Messenger Cart Notifications on your business page and you go sell on another page/platform, the customer should register once again for that new page to allow FB messenger cart delivery as per FB rules.
Customer Checkout Order Delivery - Facebook Messenger
You need two items enabled for us to deliver checkout messages via FB Messenger.
In Checkout Settings, set Facebook Messenger "ON" for "Send Order via Facebook Messenger.

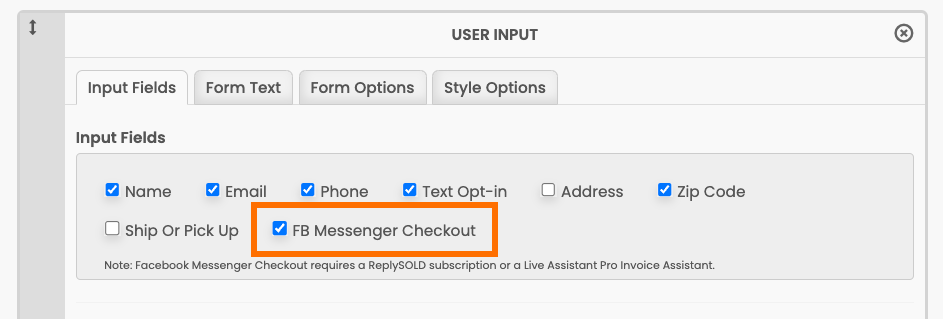
Customer Checkout Order Delivery - Landing PageIn your Landing Page (Registration Page) in the User Input panel you need to check FB Messenger Checkout and save your registration page again, then once a customer has registered with this registration page, then we can send Facebook Messenger Messages for Checkout to them to increase checkout success.
Example of Facebook Messenger Checkout. 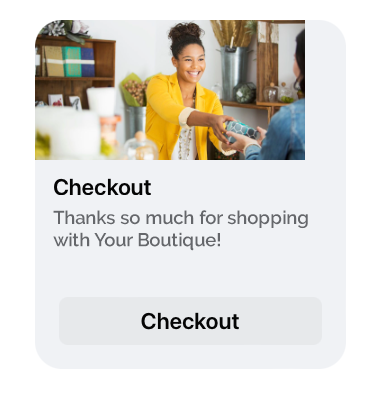
If you need help with your registration page, please reach out to support@loyalshops.com and we will help you.
Customer Checkout Order Delivery - Email
When you send an order with Checkout Assistant, we send the customer an Email.
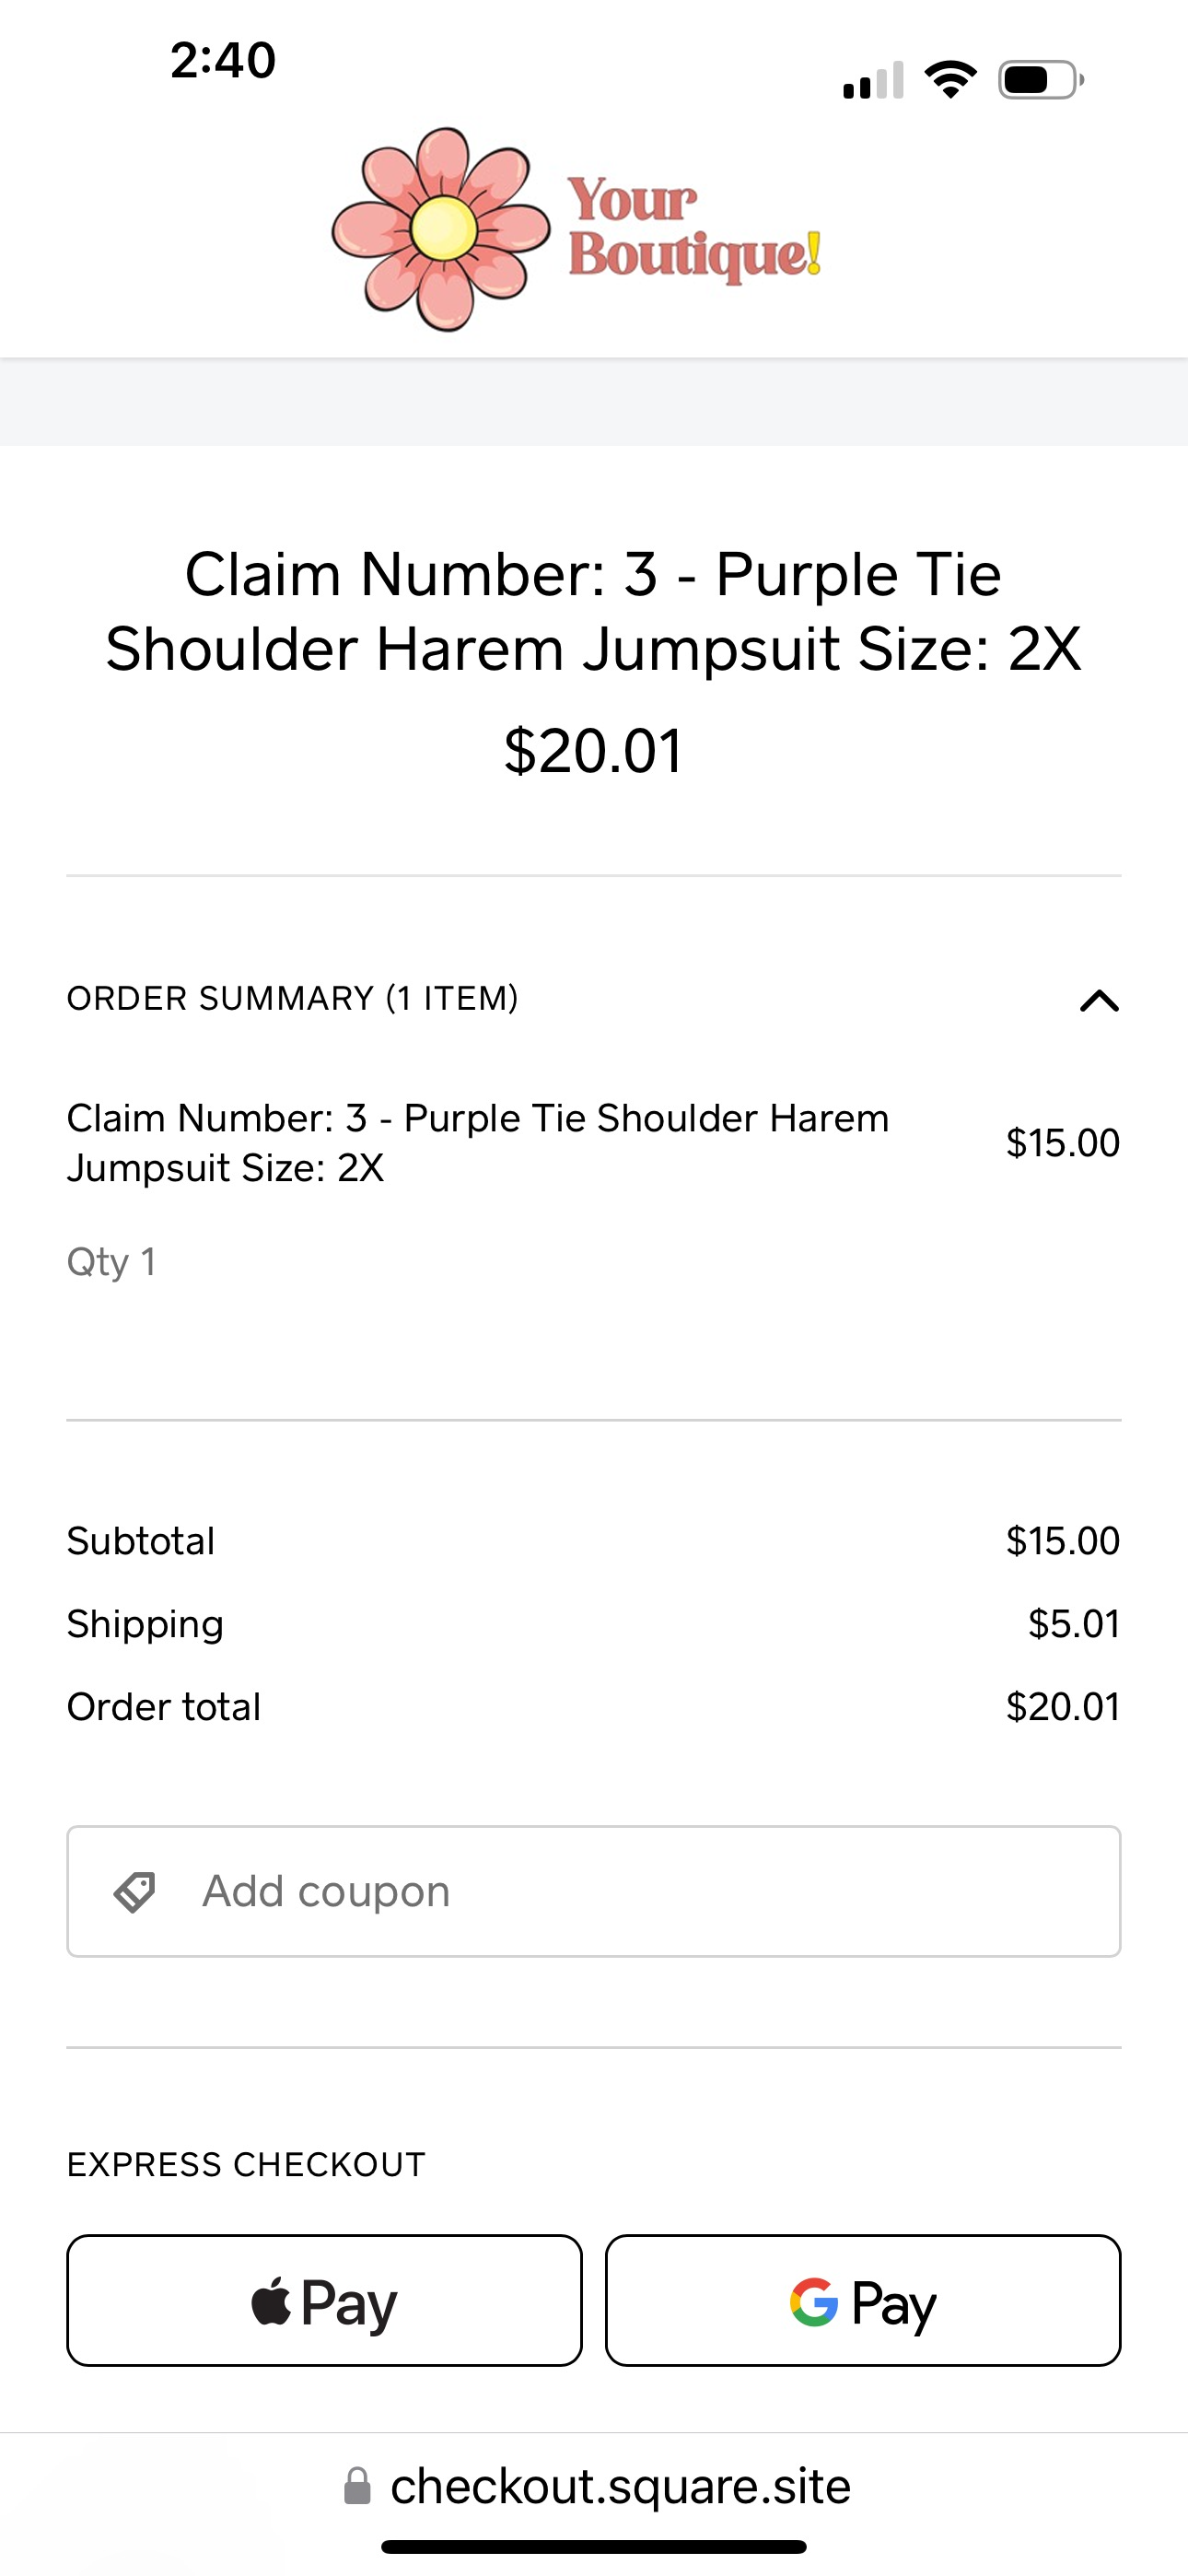
Example Email sent to your customers. You can adjust your logo and the first sentence in the Checkout Assistant Settings page. There is a Checkout button that will go straight to the Square Checkout. We also give the customer a chance to go back to the live in case they wish to shop further. 
When the customer clicks Checkout, it will take them to their Square Order to complete checkout.
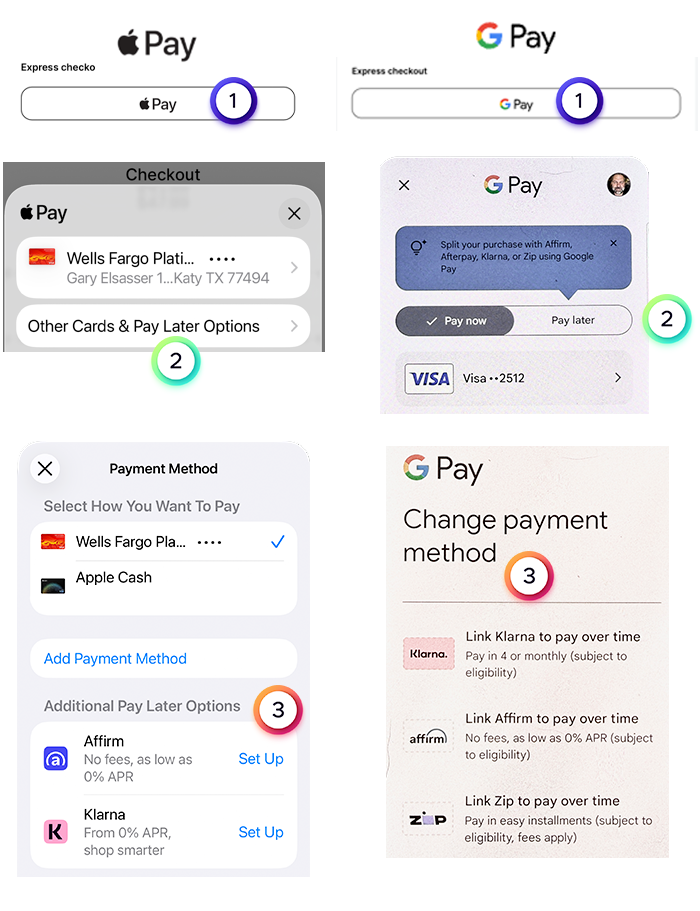
 Note: The current checkout options with Checkout Assistant for Square are Credit Card, Debit Card, Apple Pay, and Google Pay. For customers wishing to pay over time, both Apple Pay and Google Pay offer several options, including Klarna, Affirm & Link Zip. Orders must be at least $35 to enable these extended payment options.
For users with Apple Devices, in the Square Order, choose (1) Apply Pay, then (2) Other Cards & Pay Later Options , then choose one of the Additional Pay Later Options - Affirm or Klarna.
For customers with Android or Google Chrome, in the Square order, select the (1) Google Pay option, then select (2) Pay Later if order is $35 or higher, then (3) Choose one of the Pay Later Options Klarna, Affirm or Link Zip.
Getting an address from Square, Mark order as Shipped, Print Packing Slip, Refunding An Order
Note: Seeing Orders In Square - Only viewable in Square once they have been Paid
You can go to: https://squareup.com/dashboard/orders/overview and see your orders once your customers have paid them. Or you can reach the Paid Orders by going to "Items & Orders, Orders. On the right side of each listed order is a ... "three dot menu". Clicking the "..." will bring up a menu to let you view order details (including shipping address if they entered one), mark the order as in progress or mark it shipped.
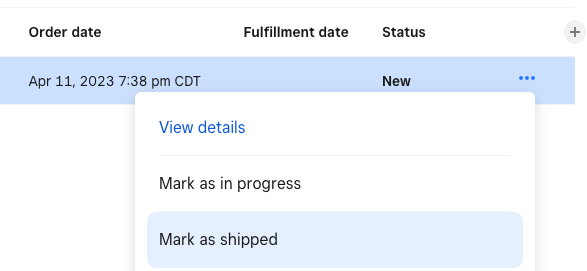
Choosing "View Details" on an order, it will show you the order items, contact info including shipping address if the customer left it in Square.
Refunding an Order - If you need to refund an order, you can choose "View Details" from this above pop-up menu or go to Main Menu, choose Transactions and click on the order.
You will then get another "..." three dot menu and "Issue Refund" is an option, as well as "Edit Customer" details like their address in Square.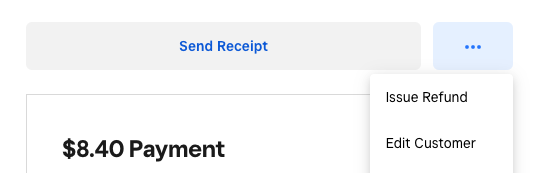
Want Order Checkout to be faster and not manual? This is the place.
Product Description & Price
If you wish to have orders created for you for checkout, we need at minimum of a general item description & price per item your selling. With Live Assistant Pro, there are many ways to give us the basic description & price for items.
To learn by reading or watching a video ways to name and price your items for a live, please review this help file: Pre-Loading Inventory - 7 Examples. Also once you watch this video, you can call us and we can help guide you to the best way to create inventory in for your busienss style.
If you are interested in barcoding your products so you can scan your items during a live, but don't have a detailed inventory list, please review this help file: Pre-built Key Price-Point Barcodes - Print them yourself & Scan
Order Settings
1) Checkout Assistant requires a Square Account: Sign up for your own Square Account if you don't have one here: Square Sign-Up
2) Enable Checkout Assistant: To use Checkout Assistant in Live Assistant Pro, the first task is to go to Live Assistant Pro / Checkout Settings menu and read and agree to the key requirements & tips on Checkout Assistant and choose Yes to proceed.
3) Connecting to your Square Account - Checkout Assistant requires your own active Square account that you can use with your Live Assistant Pro account. Click the "Link your Square store to Live Assistant Pro" button and follow the short steps to connect to your Square Account.
You will have a Green Check next to Square Account Status upon successful connection of your Square Account to Live Assistant Pro.
4) Sales Tax - It is your responsibility as the store business owner to understand the taxes you need to apply to your customers purchases. We enable the ability for you to select the tax rate levels you have created in your Square account. Please contact a tax professional if you are unsure what to charge your customer for taxes for your business. In Square, you can create Tax Rate Entries for specific State/County/City requirements. You can find that page at: https://squareup.com/dashboard/business/manual-taxes. Once you create one or more entries as needed for your unique business, Live Assistant Pro will allow you to apply those Tax Rates on a customer by customer basis. You will need to have the entry "Enabled" in Square for Checkout Assistant to use the entry.
Once a tax entry is applied to a customer, we will remember that entry and make an effort to apply it again on future orders.
Once you have enabled Checkout Assistant, you will now have an updated Sales History Page, you can choose per customer the tax rate that is needed based on your defined and enabled tax rules in Square.
You can click on Set Sales Tax % and it will bring up a pop-up with a drop down menu that will list all the Tax entries you created in your Square account so you can choose and apply the appropriate tax rate for that customer.
Once you choose one, that tax rate will be shown for that customer and then applied when you send the order.
NOTE: If you don't set a tax level for a cart and send the order, your deciding to send without tax applied. Please ensure that is your intention.
5) Shipping Costs - In Checkout Settings, you we have some basic rules you can customize to determine the default shipping prices for carts depending on how many items are claimed.
For example, if a customer claims 3 items, then as configured below, $7.00 will be applied to their orders.
In case you need to change the shipping costs, perhaps because the customer is going to pick-up so no shipping cost or perhaps the customer is located far enough away to increase shipping costs, or the items are more bulky or heavy, you can click on the Qty, Ship Price and Ship/PU text to bring up an "Edit Ship/Pickup Status or Price pop-up.
Under Shipping Price, you can manually enter a new price for that shipment. If you choose Pick-up, then shipping is set to zero. If you have already sent the order, then notice you need to change the Tax or Shipping rates, you can change them and as long as the customer hasn't checked out yet, it will dynamically alter the order for the customer to your corrected amount.
Sales History Orders
Note: It is possible to adjust an item description & change the price by clicking on them in Sales History. Even if you have sent the order to the customer, as long as they haven't paid for it, you can still change these items and they will update for the customer for checkout.
A) When you have completed a live, in Sales History each cart has a "Send Order" that is clickable.
B) Before you send the order, make sure you have the customers email, if you don't have it, you can enter it in Sales History by either clicking on "Add Email" or the "Need Email" in the Send Order area.
C) Review the Shipping area and determine if the customer is set correctly as a Pick-Up customer or are you going to Ship their order. If Pick-Up, the shipping will be set to $0. If Ship, then the default Ship price is decided by your shipping rules by quantity purchased in Checkout Settings. You can click the ship amount and manually override it for Free Shipping, Increased shipping due to bulk or weight of items, shipping delivery distance, etc.
D) Check the Tax Rate area. If it is set to "Set Sales Tax %, there is no tax rate set for this customers order. Please click on "Set Sales Tax % in order to have the proper taxes withheld. This is your responsibility as a retailer to set the proper tax amounts for your customer orders. Consult a Tax Professional to verify the correct amounts.
E) In the below example picture, you can see the Tax Rate is set to a demonstration amount of 7% for California, Orange County Tax Rate.
F) Shipping Pick-Up/Ship & Tax Rates will be saved by customer, so the next sales order is further accelerated, can still be changed if needed.
G) Once you have reviewed the Shipping and Taxes are correct, hit Send Order, and a Pop-Up comes up reminding you to set your tax rate and a Confirm Send button. Hit Confirm Send and the Order will be created in your Square account and emailed to that end customer and may be sent via Facebook Messenger as well if configured.
note: Cancel Order - Mark Paid Options: If the customer changes their mind or doesn't pay their bill, you can choose "Cancel Order". That will mark the order canceled, It will delete the items out of their cart so they can flow to the next in line on the waitlist. Mark Paid: If the customer pays for the order outside of our service, you can just mark the order paid. It will show Order Paid, and mark the items sold.
H) Notice that it now states "Order Sent" with the date/time it was sent above. The link to the order has been added as well. You can click on this link to view the order in Square and/or message it to the customer if they didn't receive it by email/FB messenger. If you click on "Order Sent", you can choose 3 additional menu options: "Cancel Order", "Mark Paid" & "Resend Order". Perhaps if the order was paid through some other way, you can choose to "Mark Paid". "Resend Order" will email the order to the customer again. If their email was wrong or not receiving it, you can change their email for the order and hit "Resend Order". Finally, you can choose "Cancel Order", and it will cancel the order for that customer. Cancelling will mark the order Canceled, the Items deleted and items will pass to the Next In Line Customers or be marked avaialble. If a customer that is passed an item already has an order that has been sent, but not paid, it will update the order with these items.
I) Once a customer pays their Order, You will get a green light and "Order Paid". Also noticed that the In Cart/Checked Out numbers change for the live automatically as customers checkout. Yellow and Green section above "Export Sales".
Customer Checkout Order Delivery
When a retailer chooses "Send Order", we send the customer an Email with information about checkout. If the customer has registered for Facebook Messenger Checkout Delivery, we will also attempt to deliver a checkout notification by Facebook Messenger as well. Please note, due to Facebook requirements, FB Messenger Notifications are specific to the rights you had when they registered. So if a customer registers for Facebook Messenger Cart Notifications on your business page and you go sell on another page/platform, the customer should register once again for that new page to allow FB messenger cart delivery as per FB rules.
Customer Checkout Order Delivery - Facebook Messenger
You need two items enabled for us to deliver checkout messages via FB Messenger.
In Checkout Settings, set Facebook Messenger "ON" for "Send Order via Facebook Messenger.
Customer Checkout Order Delivery - Landing Page
In your Landing Page (Registration Page) in the User Input panel you need to check FB Messenger Checkout and save your registration page again, then once a customer has registered with this registration page, then we can send Facebook Messenger Messages for Checkout to them to increase checkout success.
Example of Facebook Messenger Checkout.
If you need help with your registration page, please reach out to support@loyalshops.com and we will help you.
Customer Checkout Order Delivery - Email
When you send an order with Checkout Assistant, we send the customer an Email.
Example Email sent to your customers. You can adjust your logo and the first sentence in the Checkout Assistant Settings page. There is a Checkout button that will go straight to the Square Checkout. We also give the customer a chance to go back to the live in case they wish to shop further.
When the customer clicks Checkout, it will take them to their Square Order to complete checkout.
Note: The current checkout options with Checkout Assistant for Square are Credit Card, Debit Card, Apple Pay, and Google Pay. For customers wishing to pay over time, both Apple Pay and Google Pay offer several options, including Klarna, Affirm & Link Zip. Orders must be at least $35 to enable these extended payment options.
For users with Apple Devices, in the Square Order, choose (1) Apply Pay, then (2) Other Cards & Pay Later Options , then choose one of the Additional Pay Later Options - Affirm or Klarna.
For customers with Android or Google Chrome, in the Square order, select the (1) Google Pay option, then select (2) Pay Later if order is $35 or higher, then (3) Choose one of the Pay Later Options Klarna, Affirm or Link Zip.
Getting an address from Square, Mark order as Shipped, Print Packing Slip, Refunding An Order
Note: Seeing Orders In Square - Only viewable in Square once they have been Paid
You can go to: https://squareup.com/dashboard/orders/overview and see your orders once your customers have paid them. Or you can reach the Paid Orders by going to "Items & Orders, Orders. On the right side of each listed order is a ... "three dot menu". Clicking the "..." will bring up a menu to let you view order details (including shipping address if they entered one), mark the order as in progress or mark it shipped.
Choosing "View Details" on an order, it will show you the order items, contact info including shipping address if the customer left it in Square.
Refunding an Order - If you need to refund an order, you can choose "View Details" from this above pop-up menu or go to Main Menu, choose Transactions and click on the order.
You will then get another "..." three dot menu and "Issue Refund" is an option, as well as "Edit Customer" details like their address in Square.
Adding Your Logo To Square Receipt
You can go to this link and customize your branding. The Square receipt uses the Small Logo, so make sure you add the small logo as well. I used an 800x800 square logo, not sure what the limits are, but that one worked well. Square Branding
You can go to this link and customize your branding. The Square receipt uses the Small Logo, so make sure you add the small logo as well. I used an 800x800 square logo, not sure what the limits are, but that one worked well. Square Branding
Coupons
It is possible to create coupons ahead of time in Square and give to your customers and they can use them during your Live Checkouts.
1) Go to this link in your Square Account to create a coupon and save it: https://app.squareup.com/dashboard/customers/marketing/coupons
2) Share the coupon with your customer(s)
3) They can redeem it during their checkout.
Requiring Customers Leave Address OR Adding Store Policies to Order like Shipping / Return Policy.
Require Address In Square on a computer:
1) Click Top left main menu,
2) Click Online menu
3) Then Settings
4) Then Checkout
5) Scroll down to Customer Inputs
6) Choose "Edit Customer Inputs"
7) Choose "Always collect buyer address for Shipping”
Add Store Policies that show up bottom of the Order
1) Click Top left main menu,
2) Click Online menu
3) Then Settings
4) Then Checkout
5) Scroll down to Store Policies
6) Choose "Edit Store Policies"
7) Add the Policies you need.